
How Do I Make Print-Ready Files?
Print ready files save you time and allow your print project to be produced in a fast and efficient manner. One of the first steps in making a print ready file is creating a print ready PDF with some of the most commonly used design programs.
It’s an easy process using Adobe PDF Preset (in InDesign or Illustrator) or Conversion Settings (in the Adobe PDF menu that is available in many apps). The settings also have an impact on the size of the PDF file that will be created:
- The Standard option is best if you plan on posting the finished files on a website.
- High-resolution printing needs to use a commercial printing option such as High-Quality Print that will leave the color unchanged and can be used on high-quality desktop printers.
- Press Quality Print converts a document to the CMYK color model for print production and it also sets color working spaces.
In addition, print layouts can be converted to print ready files using such programs as InDesign, Illustrator and Photoshop. Print layouts can be converted into a PDF from a word document in Windows or using the Acrobat tab in MacOS.
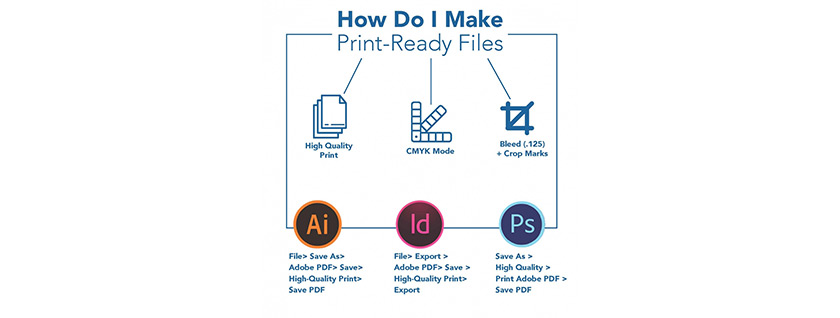
Design Program Settings For Print-Ready PDFs
Follow the steps listed below to create a print-ready PDF:
- Adobe InDesign Print-Ready PDF – Start with File>Export. Set the format to Adobe PDF and click Save. Use the High Quality Print Adobe PDF preset and then click Export.
- Adobe Illustrator Print-Ready PDF – Convert all of the text to outlines (Select>All. Type>Create outline). File>Save as. Set the format to Adobe PDF. Click Save. Start with the High Quality Print Adobe PDF preset and then click Save PDF.
- Adobe PhotoShop Print-Ready PDF – Check that the file is in CMYK mode (Image>Mode>CMYK color). Flatten the design using the layer palette drop down menu to click Flatten image. Image>Save as. Then, set the format to Photoshop PDF before clicking Save. Use the High Quality Print Adobe PDF Preset and then click Save PDF.
- The first step with Windows is opening the file. Go to the Acrobat tab and then go to Preferences to find High-Quality Print. The last step is clicking the Create PDF button.
- There are no preference settings in the Acrobat tab in PowerPoint for MacOS. Instead, click the Create PDF button and then specify where you want the file to be placed.
Popular Print Layouts
Not all PDFs are created alike which means there are different layouts available to you. Each print layout listed below requires a high-resolution PDF with crops and bleed for it to be ready to use as a print ready file. In addition, two-sided postcards or sheets need to be sent as a two page PDF or simply as two separate PDF documents that are labeled in the manner in which they should be grouped.
- Postcard – One of the most popular options is an 8.5’ x 5.5’ postcard. Please note that postcards that will be mailed need to comply with all current USPS regulations including a blank area for the address information and the barcode.
- 8.5” x 11” sheet or Tri-Panel Brochure – The PDF document will be a bit larger than 8.75″ x 11.25” because it will include the 8.5″ x 11’ size of the document as well as the bleed and crop marks. To be safe, none of the text should be closer than .25″ from the document edge.
- Standard Business Card – The PDF document will be a bit larger than 3.75” x 2.25” since it includes the document size and bleed and crop marks. Plus, the text images should be closer than .125” from the edge of the document unless it is an item that is supposed to bleed off the document.
Also, for even more tips on how to create print-ready files.
Still feel a little unsure of how to create print-ready files? If so, check out our Do’s and Don’ts List for creating print-ready files or feel free to contact us directly!
Contact Us Now for More Information
Phone: 501-376-2397

